Preference
General Tab
In the General Tab, you can configure the settings for the virtual cursor and the camera.

| Feedback | ||
| Effect |
You can select the effect for feedback images from the camera.
|
|
| Method | Auto: Automatically displays/hides the feedback according to the existence of an operator or a palm.
Shift key: Toggle show/hide by pressing the SHIFT key. |
|
| Visibility | Set the visibility of the feedback (camera view) image. | |
| Size | Set Feedback image size. You can choose from Full screen, Width 320pix, Width 400pix or Width 640pix. You can also define a custom size. |
|
| Position | You can change the display position of the feedback image. | |
| Virtual Cursor | ||
| Cursor Style | Set the style of the virtual cursor |
|
| Size | Set the size of the virtual cursor. When using large screens, choose larger-sized icons.
Hint: If the Size is set to Large or Normal, it will be relatively easy to stop the virtual cursor. If you need precise pointing, set the Size to Small.
|
|
| Show Center Ball | The center ball indicates the move and stops of the virtual cursor. You can Show/Hide center ball of the virtual cursor image. Notes: This will be disabled when you use Virtual Touch Screen mode.
|
|
| Speed | You can adjust the speed which the virtual cursor changes | |
| Transparent Mode | Display a transparent virtual cursor | |
| Flexible Cursor Size | The size of the virtual cursor will change according to the distance. Additional information: This option cannot be used for Head-Up Mode or Nearest Object Mode
|
|
| Smooth Move | This option will smoothen the move of the virtual cursor. When you set a high smooth level, the move of the virtual cursor will become smooth but the tracking performance may decrease. Please select the method that best suites your situation (contents). It is set to Level 0 by default. The default value for Virtual Touch Panel Mode is Level 4. We recommend a higher value when using Nearest Object Mode. |
|
| Camera Settings | ||
| Position Height | Camera position height from floor (cm). *This value will be used to calculate the operator's height. | |
| Camera Inclined | Inclination of the camera (°). Use positive values for downward inclination and negative values for upward inclination. *This value will be used to calculate the operator's height. | |
| Auto switching AE | When selected, aeroTAP evo will control camera's AE (automatic exposure) mode according to the environment. This option can be used in high contrast or back light environments. |
|
| FPS | You can customize the camera FPS (frame rate) settings. Typical: the value is set to 26 calculated from the best CPU consumption and performance Custom: you can set the cvalue to your choice. When setting FPS, set the value according to the CPU performance of your environment. For example, for low performance environments, setting low values will enhance the overall performance. |
|
| Upside Down | Select this option when using the you set the camera upside-down. | |
| Rotate 90 degrees | Select this option when you set the camera rotated 90 degrees (portrait mode). When you use portrait mode, the range to "auto track up and down" according to the operator's height will increase. You can also adjust the position of the virtual cursor and the hand to be more intuitive when using portrait monitors. Important: This will be disabled when you use Virtual Touch Screen mode.
|
|
| Enable MJPEG mode when using USB2.0 mode | MJPEG mode will be used when aeroTAP 3D USB camera is connected with USB2.0 mode. This will restore the FPS in an environment with low FPS. |
|
| Touchless navigation area | ||
| You can choose navigation area depending on your display size and purpose. Important: This feature is only available with Professional version.
|
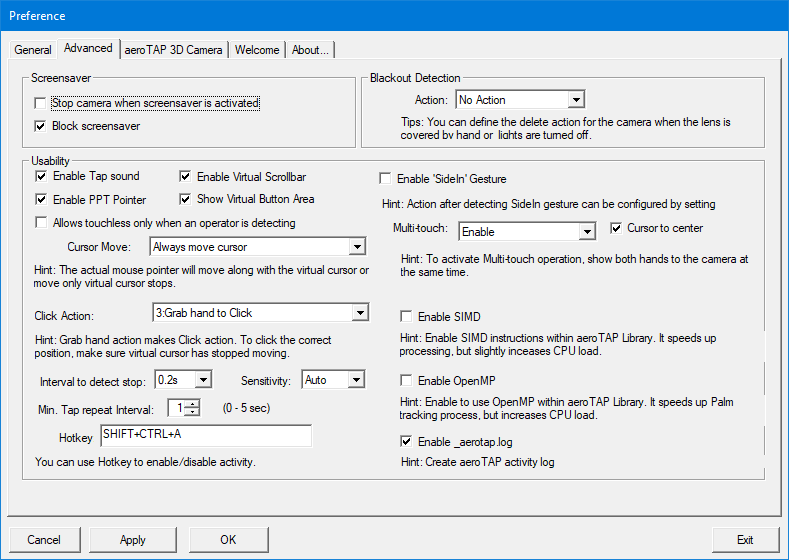
Advanced Tab
You can configure the settings for the features of aeroTAP.
| Screensaver |
||
| Stop camera when screensaver is activated | aeroTAP will automatically stop the camera when detecting the start of the screensaver. Important: When resuming from screensaver, aeroTAP and the camera will not resume automatically.
To resume the camera and aeroTAP, select Camera > Start Camera from the System tray menu. |
|
| Block Screensaver | aeroTAP will block the screensaver from running while operating aeroTAP. | |
| Blackout Detection | ||
| Action | When you cover the camera or turn the lights off, aeroTAP will detect Blackout. Select the action when Blackout is detected. The following options are available: Logoff: Shuts down all processes running in the security context and then it logs off the current user. Power off: Shuts down the system and turns off the power. The system must support the power-off feature. Reboot: Shuts down the system and then restarts the system. Shut down: Shuts down the system to a point at which it is safe to turn off the power. All file buffers will be flushed to disk, and all running processes will be stopped. Screensaver: Screensaver will be invoked. Hint: Enable Screensaver for Windows for aeroTAP to invoke screensaver.
If Screensaver for Windows is disabled, screensaver will not be invoked and aeroTAP will be paused. Notes: When resuming from screensaver, aeroTAP will be in a pause state. Because of this, please manually resume aeroTAP (Ctrl+Shift+A-key) when resuming from screensaver. |
|
| Usability | ||
| Enable Tap sound | Enable sound when Gesture or Click action is performed by aeroTAP. | |
| Enable PPT Pointer | Enable pointer function for Microsoft Power Point (PPT). |
|
| Allows touchless only when an operator is detecting | Checking this option will ignore touchless operation if aeroTAP can't detect operator. i.e. If operator is not in front of camera, palm detection will be ignored. Default: OFF |
|
| Enable virtual scroll bar | Enable Virtual Scroll Bar when using the browser set as default or Acrobat Reader. The default virtual scroll bar will only be active on both edges of the screen. It will be displayed when you stop your palm on either side of the screen. You need to set the virtual scrollbar to change the display area. 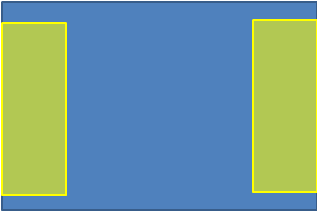 Hint: The area is limited to the yellow area.
|
|
| Display the area for virtual buttons | It will display all areas of the virtual buttons (virtual scroll bar, virtual button, virtual mouse) for each defined application. It will be displayed when you move the virtual mouse cursor to the defined area for the virtual button. It will also display all areas of the virtual buttons when switching applications. |
|
| Cursor Move | Select whether the mouse pointer will move together with the virtual cursor or not. Only when virtual cursor stops: The mouse pointer will move only when you stop moving the virtual cursor. Always move cursor: The mouse pointer will always move along with the virtual cursor. (*Default) Never Move Cursor: When the virtual cursor is displayed the mouse cursor will not move. |
|
| Click Action |
Several type of Click gestures are available. You can choose the method that best suites your situation (contents). 0 None No Click action, only moves the cursor.
1 Stop to Click click action will be performed whenever you stop moving your hand.
2 Smart Click Click action will be performed when you stop for a certain time (Interval to detect stop) on an area which can be clicked.
The cursor color will change when it is on a Clickable area. 3 Grab to Click Click action will be performed when you make a "gripping action".
Additional information: "Virtual Touch Screen" will be displayed when using Virtual Touch Screen mode.
4 Drag and Drop When you make a gripping action, it will keep the left mouse clicked until you release it.
You can also perform Zoom In/Zoom Out with one hand. Additional information: You cannot choose this mode when using Virtual Touch Screen mode.
5 Push to Click Click action will be performed when you move (push) your hand towards the camera.
Additional information: You cannot choose this mode when using Virtual Touch Screen mode.
You can also set different settings for different applications by using aeroMode.ini.
|
|
| Interval to detect stop | You can adjust the interval to detect the stop of the cursor. Adjust the interval according to the method you choose in Click actions. The following values are set by default. 0.6 seconds for Stop to Click and Smart Click 0.4seconds for the other methods |
|
| Sensitivity | You can adjust the interval to detect the stop of the cursor (sensitivity of the detection). If the virtual cursor is unstable, set this option to LOW. Normally it will be set to Auto. The sensitivity will be adjusted automatically based on the distance. |
|
| Min. Tap repeat Interval | Set minimum interval to repeat click/gesture action. It can prevent unnecessary clicking such as clicking twice by mistake. Setting the value to 0 will be calculated to 0.25seconds. |
|
| Hotkey |
You can change Hotkeycombination to Pause or Resume aeroTAP. Hint: By default it is set to Ctrl+Alt+A.
|
|
| Enable Side-In Gesture |
When Side-In Gesture is enabled, you can invoke special actions easily by Side-In Gestures. Hint: You can assign your own Side In gestures such as Exit Application,run aeroPAD,or to toggle Windows applications. Hint: You cannot use this feature when Head-up mode is enabled. |
|
| Multi-touch | Enables operation using both hands (two hands). Hint: To detect both hands,show both hands at the same time.
|
aeroTAP 3D camera Tab
This tab is only available when using aeroTAP 3D USB Camera.
You can check depth map and image from aeroTAP 3D USB camera. Also you can adjust depth range and zoom in/zoom out settings.
Additional information: This screen will not be displayed when you launch aeroTAP with Virtual Touch Screen mode.
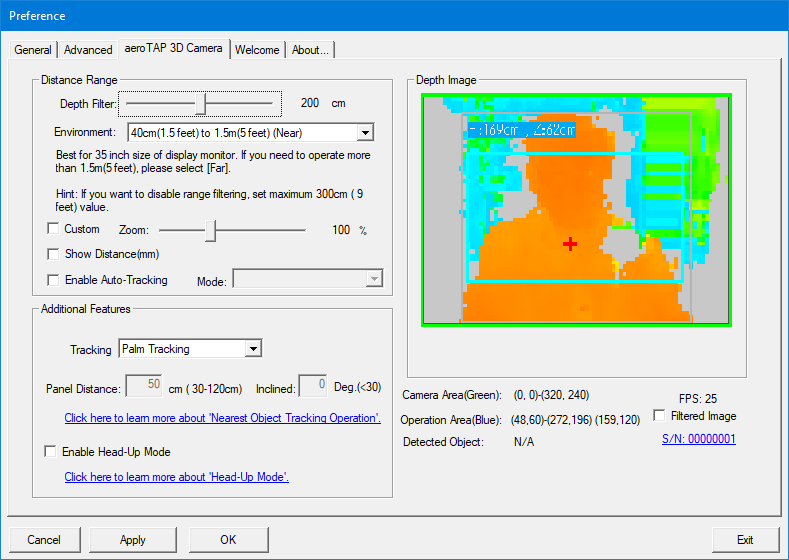
Green area shows the camera detection area
Blue area shows the area used for operation. ONLY the feedback data inside the blue area will be used.
| Distance Range | ||
| Depth Filter | Depth filter allows you to restrict detection distance (the distance from the camera). Use this setting when operating close to the camera. If the depth sensor cannot acquire the correct distance information because of the environment, please disable depth filter by setting the value to the maximum 300. |
|
| Environment | You can choose Near or Far operation. Choose Near when you operate within 150cm (about 5 feet) from the camera and Far when operating from a farther position (4-8 feet). Set the environment according to the size of the screen and the position easy to operate. |
|
| Zoom | If you need to further adjust the position you set in Environment, use this option. | |
| Show Distance | The distance of your palm will be displayed using the unit mm. This option is only available when the style of the virtual cursor is set to Simple. |
|
| Enable Auto-Tracking | When this option is enabled, position of the operator will be tracked using the depth image. The height of the operation area will be automatically adjusted. | |
| Mode | Adjust Vertical: Adjusts the area vertically based on for example the height of the operator. The blue frame in the depth image (operation area) will move up/down based on the height of the operator. Adjust horizontal: Adjusts the distance (zoom value) based on the distance of the operator. Adjust vertical/horizontal: Adjusts the operation position up/down/right/left based on the distance and height of the operator. |
|
| Additional features | ||
| Tracking (detection) Mode | You can select the detection/tracking mode from detection/tracking of the palm or tracking of the nearest object (operation close to the camera, regardless of the shape). When Nearest Object tracking mode or Grab to Click is selected, click action will be performed when you touch the defined virtual surface. When Push to Click is selected, click action will be performed when you make a pushing action (about 10cm towards the camera). For more information about Nearest Object Mode, check this page. Set the Panel Distance (cm) to create a virtual touch panel at the defined distance from the camera. Hint: Nearest Object tracking Mode supports virtual button features except Side-In Gesture.
Hint: Operation distance for Nearest Object Tracking Mode is about 40cm to100cm. This distance is the same when setting the camera Far. Hint: For a more stable performance with the virtual cursor when using Nearest Object Mode, we recommend a higher value for Smooth Move.
Hint: Nearest Object Mode detects the nearest object in the specified operation area. You can exclude specific areas by defining the operation area.
|
|
| Enable Head-up Mode | When you enable this mode, set the camera facing upwards, and operate with your palm facing down towards the camera. Moving your palm up/down represents Y-axis movement, moving right/left represents X-axis movement. For more information, see Head-Up mode. Hint: When you enable Head-up Mode, you cannot use Side-In features.
Additional information: When Head-Up mode is enabled, Zoom value will be automatically adjusted to the minimum value. |
|
| Depth Image | ||
| Camera Area | This is camera view area | |
| Operation Area | The blue frame indicates the operation area. This area will be displayed for Feedback. | |
| Detected Object | A person, object, fingertip or center point will be displayed with a rectangular and a mark representing it. Makes the decision to display or hide the guidance image (detects if a person is present or not). For more information, see Utilize Show Guidance feature. |
|
| Show Camera View | Check this option to show the camera image (color). |
Welcome Tab
When you start aeroTAP for the first time, this dialog will be displayed.
You can do a brief check of the camera image and the operation position.
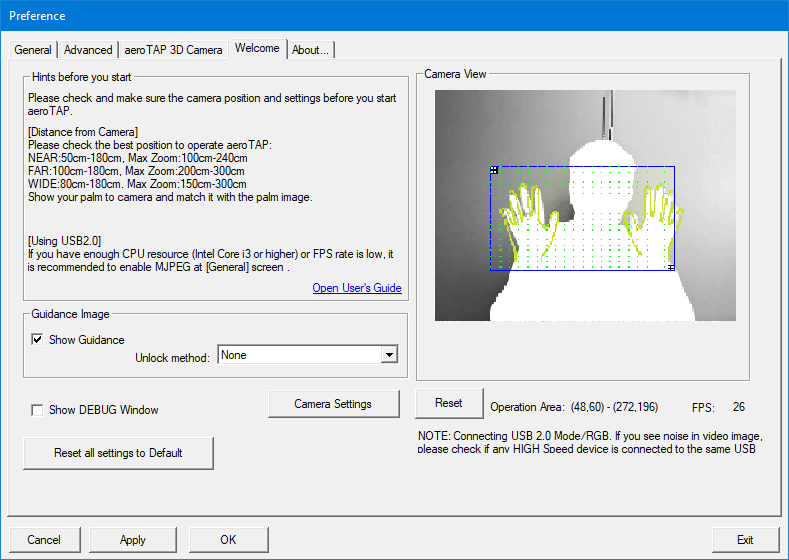
| Show Guidance |
If this option is checked, aeroTAP will show 'Guidance Image' on screen when idling (no palm detecting). When you start operating,the guidance will automatically disappear. When the operator moves out of the camera view, the guidance image will be displayed again. The depth filter will be applied to detect operator existence. Hint: Prepare a image file SplashGuide.bmp in the folder where aeroTAP.exe is located. You can freely change the Guidance image. For more information about customization of guidance image, see Modify Guidance Image. (for Professional version only)
|
| Lock operations | When you enable the Show Guidance feature, select the Unlock method too. When operation is locked, operations such as click cannot be performed until the selected action is made. Only the virtual cursor will be displayed. When Move cursor to Guidance image is selected, the operator needs to move the virtual cursor to the guidance image to hide it and enable operations such as click actions. The next time the guidance image is displayed, the operation will also be locked. |
| Show DEBUG window | When you launch aeroTAP with this option enabled, DEBUG Window for aeroTAP will be displayed on the top of the screen. The name of the active window and the caption name will be displayed.  These information are helpful when setting INI files for virtual buttons and other features. |
| Camera Settings | When you click this button, the Preference window for the camera will open. You can adjust the advanced parameters for the camera. |
| Move Operation area | The blue framed area displayed will be the operation area. By dragging the blue frame area, you can adjust the position of the operation area. Hint: Taking account that camera position and monitor display position has a connection, by tweaking the operation position up/down/right/left, you can achieve an increased intuitive operation.
For more information, see Customization of the operation area. |
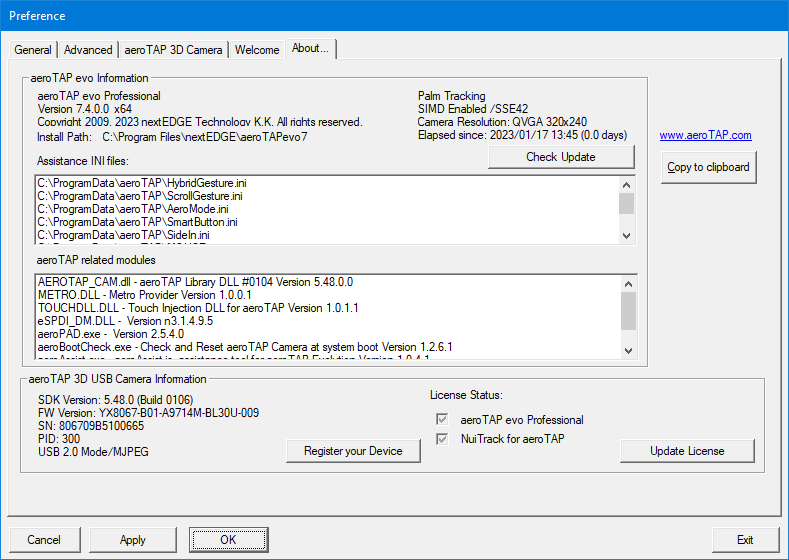
Version information Tab
You can check the software version and available updates.