 What is aeroAssist?
|
aeroAssist is an assistant tool to make aeroTAP touchless operation more simple. When using with aeroTAP evo, the touchless operation will be more comfortable when operating public devices such as KIOSK and E-Signage displays. To use aeroAssist, you have to preset interactive areas as Click Action Area based on the screen design (UI) of your application and save it in aeroAssist.ini. By doing so, an auto click or other defined action will be performed when the cursor is on that predefined area. It is similar to the Stop to Click mode of aeroTAP, but it is more user-friendly even for those who don't know the aeroTAP Touchless interface. To use aeroAssist.exe together with aeroTAP, check that aeroAssist.exe and the latest aeroTAP_CAM.DLL is in the same folder before you run it (make sure aeroAssist.exe is in the same folder aeroTAP is installed).
Hint: To use together with aeroTAP evo, set Click action of the Advanced tab on aeroTAP to None. This will restrict the operation to the action area set by aeroAssitst. |
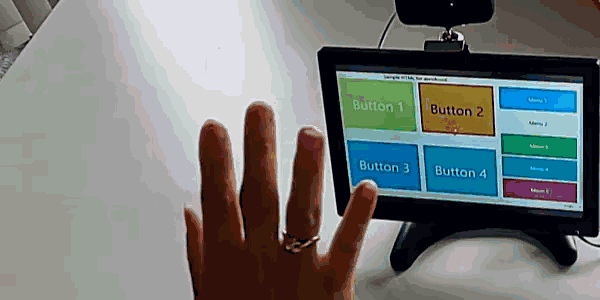
Usage example:
The picture below shows how aeroAssist works on KIOSK Mode (HTML page with full screen ). By using aeroAssist, an operator can select a button easily. When the cursor is hovering on Button 4, aeroAssist will show Click action cursor so the user can make the click action.
Main Features
- Allow users to define multiple action areas and application screen.
Action area will be defined in the aeroAssist.ini file.
- Customize click cursor size, speed and color.
To meet your content, you can change the color and size of the click cursor.
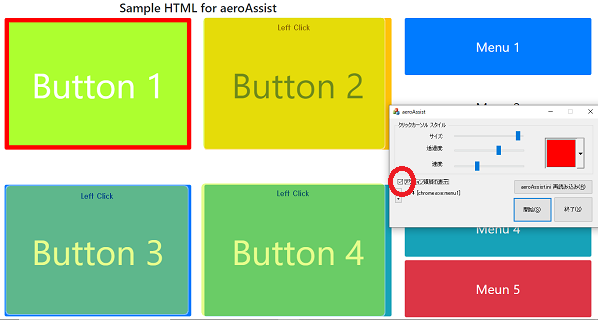
- Feature for checking settings
When Show Action area checkbox is turned on, it will show the selected action area on the screen.
The defined action area will be shown with light green highlight. You can edit the aeroAssist.ini while checking it on the screen.
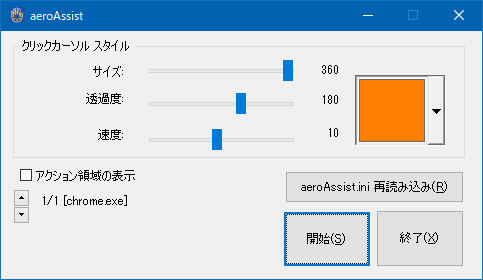
aeroAssist Setup Screen
aeroAssist has the following parameters that you can define.
| Content | Description |
|---|---|
| Click Cursor style Size
|
Define the size of click cursor |
| Transparency | Define the transparency of click cursor |
| Speed | Define the duration for the click action for the click cursor |
| Color Selection | Define the color of the click cursor |
| Show Action area | When you enable the checkbox, the defined action area will be displayed on the screen When aeroAssist is not running, you can toggle the display of all settings saved in the definition file, using the up/down spin button at the bottom. When aeroAssist is running, the action area set for the currently active application will be displayed. (Switch to an active window) |
| Reload aeroAssist.ini file | When you click the button, the definition file aeroAssist.ini will be reloaded. |
How to launch, set the initial settings and exit aeroAssist
The following is general information on how to start and terminate aero Assist.
1. Run aeroAssist.exe and launch aeroAssist.
2. Edit aeroAssist.ini with the text editor (save as ANSI).
3. To check the settings, enable the Display action area checkbox and toggle the display with the spin control button on the bottom
Edit aeroAssist.ini while checking the area shown on the screen. When finished editing, click、Reload aeroAssist.ini file button and apply the changes.
4. After checking the settings, disable Display action area and click Start button to start.
When started the dialog will automatically be minimized. When you display the aeroAssist screen using Alt-Tab key, it will automatically be minimized in a couple of seconds.
You can stop by displaying aeroAssist screen with Alt-Tab key and pressing 'S' key or clicking Stop button.
aeroAssist boot parameter
You can adjust the following parameters in aeroAssist:
| Parameters | Description |
|---|---|
| /a or /A | Automatically starts with the last used settings. |
| /n or /N | Operates without cooperating with aeroTAP evo (the movement of mouse cursor). Use in an environment without aeroTAP_CAM.DLL or when editing aeroAssist.ini. |
Format of aeroAssist.ini
Setup the area that needs assistance of each application to aeroAssist.ini beforehand.
Use the following format for aeroAssist.ini and save it in the same folder as aeroAssist.exe. The sample ini can be found in the sample.ini folder where aeroTAP is installed.
|
// Resolution of the reference screen
screen size: Screen Width,Screen Height [program name:{caption name}] RECT (Left , Top, Width ,Height), {action},{(coordinate XY)} CIRCLE (Center X, Center Y, Radius),{action},{(coordinate XY)}
...
*For screen size, enter the resolution of the coordinate system set in the setting file. By default, it is set to select the coordinate system in 320x240 screen.
The area coordinate will be recalculated according to the actual resolution when executed.
*Program name is file execution (.exe) name. Caption name is program's caption name (for browser, the title written in the html).
Hint: For more information about program name and caption string, go to Hints for setting ini file. * RECT To set a rectangle area, specify (Left, Top, Width, Height).
*CIRCLE To set a circle (square) area, specify (Center X, Center Y, Radius).
*{action} specify numbers. 0: Click, 1: Double click. Blank will make it a click.
*insert ,(comma) between each parameter.
*Parameters with {} can be omitted (left blank). Do not write {} at setup. *coordinates XY can be left blank and only action 0,1 (click ,double click) will be active. When defining the coordinates of the screen, use absolute values.
Example: screen size: 320,240 // [devenv.exe] RECT (0,0,100,100) RECT (250,130,50,100),1 CIRCLE (160,120,60),1 [mspaint.exe]
RECT (0,0,100,100),0,(500,800) *Click the coordinate (500,800).
For the following application, specify using a special string for Application name.
Desktop screen > Desktop
Microsoft Edge brower > MicrosoftEdge
|
Hints for defining action area
Here is one way to define the action area.
1. Launch the application and take a screenshot.
2. Paste the screenshot copied from MSPaint.exe (Paint) and convert the size to 320x240pixel.
3. From a 320x240 size screen, acquire rectangle coordinate of the action area.When you choose rectangle selection and drag, the coordinates and the size value will be displayed in the status area of the Paint screen.