Tutorial: Configure Virtual Button area
aeroTAP offers interface assistant features such as virtual button, virtual scroll bar, and virtual mouse. These features will be displayed and become accessible when you stop the virtual cursor at any given position.
To set multiple virtual buttons and make those buttons valid for certain areas according to the content, you can adjust settings for each virtual button.
Configure the area
Define the area for the virtual button by writing with the grammar (Left,Top)-(Right,Bottom) after the application name in each ini file.
Example: HybridGesture.ini
[Chrome.exe]
(50,50)-(160,140)
104,19486,19230,105
This area will be shown in 320x240 (QVGA) coordinates regardless of the actual output monitor size. For an output monitor with 1980x1080 (Full HD) resolution, (0,0)-(320,240)will be the corresponding position of the monitor coordinates (0,0)-(1920,1080).
You can configure the position according to the actual monitor screen with the following steps:
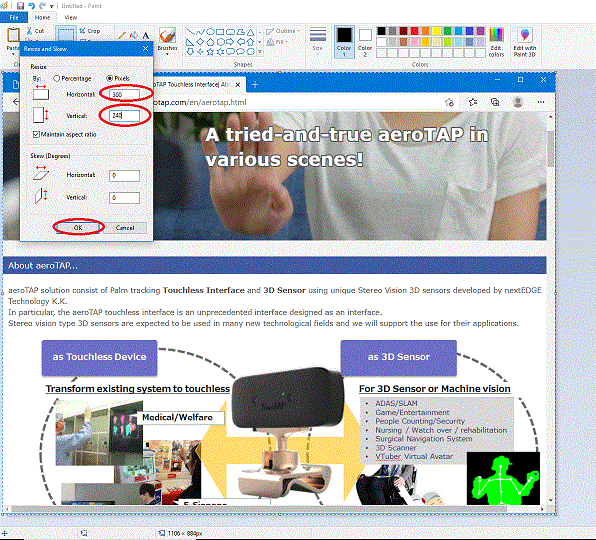
1. Prepare a screenshot image of the actual output screen
2. Open the file with a image editing software and adjust the size to 320x240.
3. After you adjust the size, draw a rectangular area for the virtual button. When doing so, get the starting point of the rectangular area and the size which is displayed on the bottom when using MSPaint, and insert the value to (Left,Top)-(Right,Bottom) of the ini file.
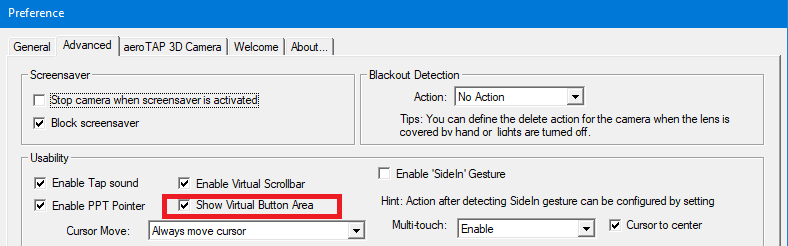
4. Save the ini and launch aeroTAP to check the settings. If you have the Show virtual button area checkbox in the Features tab of the Preference screen activated, the application will show the button area so you can check if the configuration is correct.
Important: When using MOUSE.ini and another virtual button together, set the effective area not to overlap each other. When stopping the virtual cursor, the virtual button will be displayed, but if the virtual mouse is set to the same area, the virtual mouse will be prioritized and the virtual button can't be used.
Hint: When editing ini file while running aeroTAP, you can import the ini file and apply the change by using Ctrl+Shift+C key to show the Preference screen and then start aeroTAP by pressing OK.