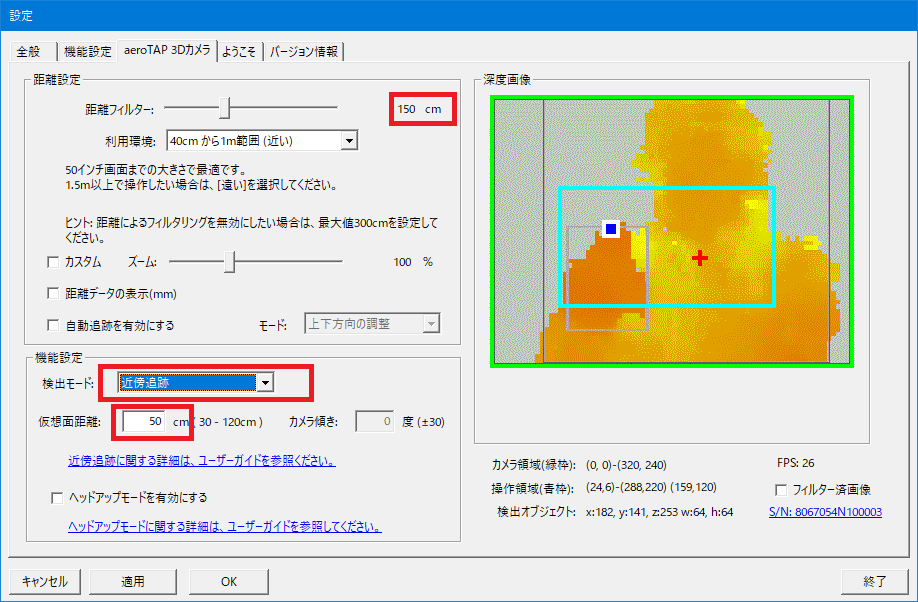
Nearest Object Tracking mode can be selected from the Tracking mode in the aeroTAP 3D camera settings. This mode enables operation of the cursor not by palm tracking but by tracking nearest object that is within the range of about 100cm from the camera.
Nearest Object Tracking mode detects and tracks the nearest object using the distance information from aeroTAP 3D USB camera. For example, you can operate the virtual cursor by moving your hand or an object close to the camera, which will be tracked. This mode is useful when palm operation is difficult in your environment; for example when the camera is facing own and cannot capture the upper body of the operator.
Important: The difference between Palm Tracking is that if there is a person of object close to the camera, it can interfere smooth operation. This mode doesn't detect shapes such as the palm, so when someone or something gets close to the camera, it can accidentally be detected and tracked. This mode does not suit environments with some or something nearby.
This mode is effective in environments where distance data can be acquired relatively well. Please be sure to check your environment beforehand, using the depth image. In some environments, you can improve the situation with the information mentioned in Configuration of depth mask when the depth data acquired is incorrect. You can also restrict the Nearest object detection range by adjusting the operation area. You can remove unnecessary objects from the camera range by adjusting the operation area.
Hint: There is a significant change in the Nearest Object Tracking feature compared to version 6.x. For information about the feature for version 6.x, please check Nearest Object Tracking Mode Version 6.x. Nearest Object Tracking Mode for version 7.x will be processed similar to Virtual Touch panel mode. It will create a virtual touch surface/panel. However, the following is different from the Virtual Touch Panel feature.
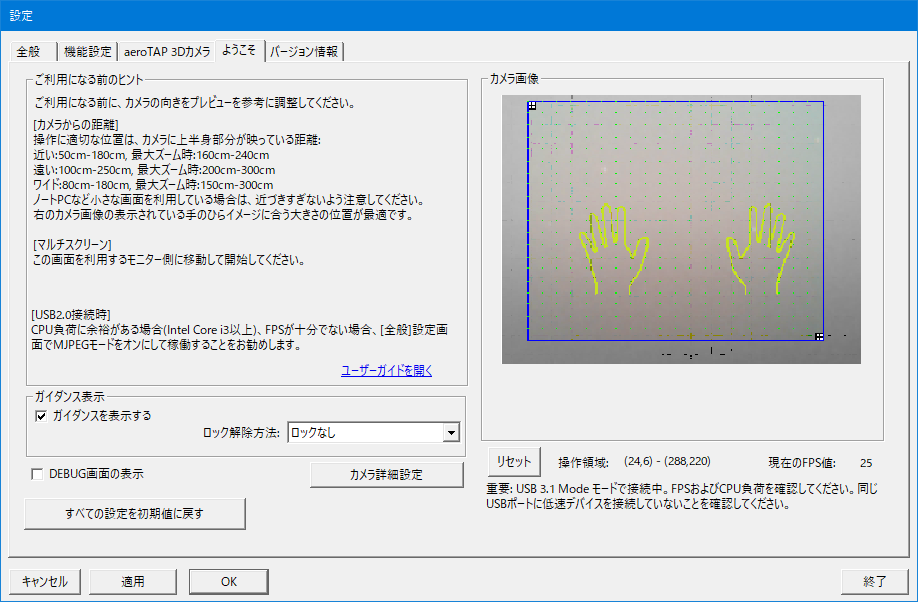
Distance from the camera is about 40cm or more
Does not need calibration
Important: This mode is more useful for big buttons or pictures rather than precise operations.
Hint: To make the virtual cursor move more smoothly, go to Settings for Virtual Cursor in the General tab and adjust the value for Smooth move parameter.
Create virtual surface (virtual touch panel) and Click actions
When you select Nearest Object Tracking Mode, a virtual touch panel (surface) will be created at the position (distance measured from the camera) you defined in Distance of Virtual Touch panel option. If you install the camera with an angle, you can set the angle ( -30 to +30°).
The "blue dot" or the "green dot" displayed on the depth image indicates the nearest object. The "green dot" indicates that the nearest object is touching the virtual surface (virtual touch panel). You can check if tracking goes well in your environment, by moving your finger close to/away from the camera.
Click action will be performed when "touching the virtual surface (virtual touch panel)" or "pushing forward".
Click actions
Area Configuration
Touching the virtual surface (virtual touch panel)
We recommend that you use Grab to Click in the Recognition of Click actions (Feature Settings tab).
The virtual surface (virtual touch panel) will be created to the defined position measured from the camera.
Pushing forward
Choose Push to Click in the Recognition of Click actions (Feature Settings tab). Click action will be performed when you make a pushing action (about 10cm towards the camera).
Click action will not be performed by just touching the virtual touch panel. You need to make the pushing forward action when you are on the virtual touch panel.
The recommended settings are shown below: Set the distance filter around 140cm according to the detection distance. Configure the operation area size wide. To operate in a closer range, set the distance filter to a smaller value. When the camera is facing down, you also need to set the angle of the camera.
Hint: In some environments, aeroTAP 3D Camera may not be able to acquire the depth image successfully. The blue point in the depth image indicates that the nearest object is detected and tracked successfully. Please make sure of this before starting the operation.
Important: It is hard to make precise operations in Nearest Object Tracking mode. This mode is more useful for big buttons or pictures.
Hint: To make the virtual cursor move more smoothly, go to Settings for Virtual Cursor in the General tab and adjust the value for Smooth move parameter.
Video Tutorial
Tracking (detection) Mode
Tracking (detection) Mode
Description
Palm Tracking
Only detects and tracks the palm
Nearest Object Tracking
Only detects and tracks nearest object. It will not detect the palm.
How to use Nearest object tracking mode
The range of detecting an object for Nearest Object Tracking mode is 40cm to 100cm. Your fingers will be detected when you move them close to the camera. Please be aware of the following point when using a pen or a thin stick. Nearest Object Tracking mode detects the closest point but if it is too small or too thin it cannot be detected as an object. The best size for detection is using 2 fingers or a fist.
Click Actions in Nearest Object Tracking Mode
You can choose from the following click actions; Click when Stopped, Grab to Click (Tap virtual surface), or Push to Click.
Important: We recommend the use of Push to Click for Nearest Object Tracking Mode.
Actual Operation
Description
Pointing
Pointing with 2 fingers will make the operation stable than using just one finger.
Click
Click action will differ according to Types of Click actions settings in Advanced Settings.
When Grab to Click is selected, click action will be performed when you touch the virtual surface (virtual touch panel).
When Push to Click is selected, click action will be performed when you make a push action on the virtual surface (virtual touch panel).
Nearest Object Tracking Mode configuration hint
When pointing with Nearest Object Tracking mode, cursor movement will become unstable when operating from a distance. On the other hand, pointing will be more difficult when operating from a closer point. When Nearest Object Tracking Mode is selected, you can enhance the usability using one of the following
1. To make the virtual cursor move more smoothly, adjust the value for Smooth move parameter in the General tab.
This slows down the cursor's moving speed but the move will be much smoother. Select for example the value x4.
2. Use Push to Click for Recognition of Click actions
We recommend that you use Push to Click in the Recognition of Click actions (Feature Settings tab). Push to Click detects the stop of the virtual cursor and when pushed about 10cm towards the camera, it performs a click action.
3. Tilt the camera about 20 degrees
You can tilt the camera for the maximum of 30 degrees so you can operate without moving your hand too high. This mode is useful when the camera cannot capture the upper body of the operator. If you tilt the camera too much the click recognition accuracy will drop.
4. Display the Guidance image and use operation lock
Nearest Object Tracking mode has a higher possibility of false recognition of operation than palm tracking. This happens because it tracks whatever is the most closet to the camera. To reduce false recognition, we recommend using the Display of Guidance Image and Using Operation Lock Feature. This will perform the operation made only by the operator.
5. Expand the operation area to the camera view in Welcome tab (Only for Professional version)
This will enlarge the ratio of the operation area and the actual screen size making the operation stable and also enables detailed pointing operations. You can also remove unnecessary objects from the camera range by adjusting the operation area.
6. Configure depth mask
In some environments, the depth map acquired may not be correct, because the Nearest Object tracking Mode tracks the nearest object using the depth map from the 3D sensor. You can improve this problem by Configuring depth mask after setup.